TL;DR: Linux is a piece of shit – it simply doesn’t work.
I picked up a 17" Intel Core 2 Duo iMac for £20 with the intention of installing Ubuntu. Silly me; it seems to be a bit of a lemon.
The problem is
Select CD-ROM Boot Type :
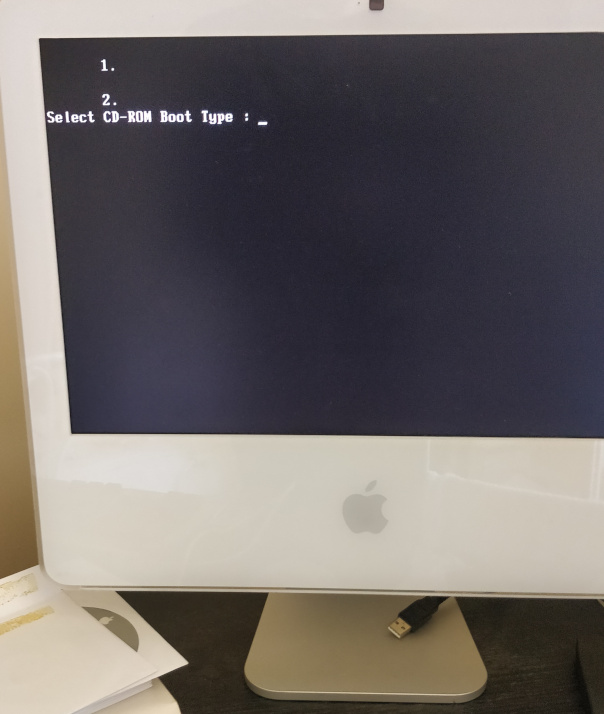
This happens because although the CPU in the iMac is 64-bit the EFI is 32-bit.
The solution described here for a Mac Mini is:
/EFI/BOOT on the Ubuntu flash drive. I had to delete BOOTx64.EFI in order to make space for it.
I found that I could generally make something bootable by using Rufus to make a USB flash drive (or USB hard drive) from the iso
image and then adding biitia32.efi to /efi/boot.
When booting it was necessary to edit the grub command to remove quiet splash and add nomodeset.
However, this was pretty pointless because none of the installers I tried either for Ubuntu or Mint, including Matt Gadient’s tweaked linux installers worked.
Normally the installer would freeze while continuing to thrash the hard drive. On one occastion I did manage to install Ubuntu 20.04 but it wouldn’t boot: not at all.
As I was trying installer after installer I found that the Debian installer came the closes to working:
quiet splash and add nomodeset consoleblank=60 when booting the installer;ncurses installer and not the X11 one; andSo: now I do at least have a working command line only Debian system.
I have built-in ethernet and a USB ethernet adapter that I want bridging together.
# apt-get install bridge-utils
# brctl addbr br0
The bridge br0 now appears in ip a and so can be set up
using /etc/network/interfaces as follows:
iface enp2s0 inet manual

iface enx00808e8c92f8 inet manual

iface br0 inet static
	bridge_ports enp2s0 enx00808e8c92f8
	address 192.168.1.51
	netmask 255.255.255.0
Reboot.
Now I can connect from my SE/30 on built-in ethernet at 192.168.1.30 to my iMac G4 on the USB ethernet at 192.168.1.4.
It exists:
# lspci
...
03:00.0 Network controller: Broadcom Limited BCM4321 802.11a/b/g/n (rev 01)
...
# ip a
Next thing to do is to add contrib non-free to /etc/apt/sources.list
in order to get drivers.
apt-get install firmware-b43-installer
After a reboot interface wlan0 has appeared in ip a.
Now it needs connecting to the wifi. Don’t use connman because it does some bollocks
with a dhcp server which breaks the static IP address on built in ethernet.
# apt-get install iw
# iw dev
phy#0
        Interface wlan0
                ifindex 4
                wdev 0x1
                addr 00:17:f2:99:7b:9b
                type managed
                txpower 0.00 dBm
# ip link set wlan0 up
# iwlist scan
# apt-get install wpasupplicant
And then add to /etc/network/interfaces (the package wpasupplicant adds support for the /wpa- keywords):
allow-hotplug wlan0
iface wlan0 inet dhcp
        wpa-ssid RWB
        wpa-psk password
And bring up the interface...
# ifup wlan0
And it continues to work after a restart!
I had been using static IPs that I can remember on my local network (for example the Mac SE/30 is .30, etc.) but it would be better to use local DNS (although I’ll map the MACs to my chosen IPs) — so that means DHCP. I also want to run a local caching DNS server.
It turns out that there is a package for this: dnsmasq.
# apt-get install dnsmasq
Set up the DNS and DHCP in /etc/dnsmasq.conf
interface=br0 # for listening to DNS
dhcp-range=192.168.1.101,192.168.1.199,12h # enable DHCP
dhcp-host= B0:48:7A:80:7E:69,desktop,192.168.1.10,infinite # win10 desktop
dhcp-host= 04:0E:3C:A0:25:72,work,192.168.1.19,infinite # work laptop
#dhcp-host= X:X:X:X:X:X,se30,192.168.1.30,infinite # Mac SE/30
#dhcp-host= X:X:X:X:X:X,imacg4,192.168.1.4,infinite # iMac G4
#dhcp-host= X:X:X:X:X:X,laptop,192.168.1.43,infinite # win10 laptop
Since this machine won’t be doing much Internetting it’t not important for DNS requests from the local machine to go through the cache.
After /etc/init.d/dnsmasq restart I find that the MacBook gets configured as specified.
I like this:
$ nslookup work
Server:         172.22.176.1
Address:        172.22.176.1#53

Non-authoritative answer:
Name:   work
Address: 192.168.1.19
This is an old friend! My first experience with IP masquerade was running Debian on a PowerMac 7200 in 2001
so that our PhD student house could share a cable modem that the provider tied to a MAC address.
That took weeks to get working, too. It was ipchains back then, and I had to compile a kernel
to support masquerade which took an afternoon while I was watching the World Trade Center disappear!
Here is the iptables configuration:
# iptables -A FORWARD -o wlan0 -i br0 -s 192.168.1.0/24 -m conntrack --ctstate NEW -j ACCEPT
# iptables -A FORWARD -m conntrack --ctstate ESTABLISHED,RELATED -j ACCEPT
# iptables -t nat -F POSTROUTING
# iptables -t nat -A POSTROUTING -o wlan0 -j MASQUERADE

# echo 1 > /proc/sys/net/ipv4/ip_forward
Since /etc/rc.local is now deprecated we need to find a different way to
restore
the rules at boot:
# apt-get install iptables-persistent
# iptables-save > /etc/iptables/rules.v4
Conveniently, installing the package also saves the current rules to /etc/iptables/rules.v4.
Similarly, the ip_forward needs persisting by un-commenting the corresponding line in /etc/sysctl.conf.
Finally, although the server is already behind a firewall and therefore it’s ver unlikely that anyone
could possibly attack it on wlan0 we shall nevertheless drop all unwanted incoming traffic to that interface.
iptables -A INPUT -m state --state ESTABLISHED,RELATED -j ACCEPT
iptables -A INPUT -m state --state NEW -i br0 -j ACCEPT
iptables -P INPUT DROP
Note that iptables -F does not clear everything!
It’ useful to keep a full script. Here it is:
#!/bin/sh

iptables -t nat -F
iptables -t mangle -F
iptables -F
iptables -X

iptables -A FORWARD -o wlan0 -i br0 -s 192.168.1.0/24 -m conntrack --ctstate NEW -j ACCEPT
iptables -A FORWARD -m conntrack --ctstate ESTABLISHED,RELATED -j ACCEPT
iptables -t nat -F POSTROUTING
iptables -t nat -A POSTROUTING -o wlan0 -j MASQUERADE

# echo 1 > /proc/sys/net/ipv4/ip_forward

iptables-save > /etc/iptables/rules.v4
As might be expected, MacSSH for System 7 doesn’t support all the latest
thingamajigs. It was a bit of a faff trying to find out what MacSSH has in common with sshd.
It turns out that this in the sshd_config allows MacSSH to connect.
KexAlgorithms ecdh-sha2-nistp256,ecdh-sha2-nistp384,ecdh-sha2-nistp521,diffie-hellman-group14-sha1,diffie-hellman-group-exchange-sha256,diffie-hellman-group1-sha1

Ciphers aes128-ctr,aes192-ctr,aes256-ctr,3des-cbc
Mac OS X 10.2 doesn&rsquot; support the SSH thingamajigs that are on Debian 10. To connect from Debian to 10.2 we can simply specify use of the obsolete options:
$ ssh -oKexAlgorithms=+diffie-hellman-group1-sha1 -c aes128-cbc rwb@192.168.1.4
And this can be done automatically by adding to /etc/ssh/ssh_config
Host 192.168.1.4
        KexAlgorithms +diffie-hellman-group1-sha1
        Ciphers +aes128-cbc
To connect from 10.2 to Debian we have to allow on Debian the algoritms that 10.2 has. The problem is finding out what value to add.
The basic idea is to prioritise interactive traffic such as SSH over possibly long-running bulk such as FTP.
Quality of service is implemented by the the tc command in the
iproute2 package.
Fortunately, it’s already all been done for us by wondershaper.
Unfortunately, the version of wondershaper in Debian is old and decrepit so we have to build it...
# apt-get purge wondershaper
# cd
# mkdir wondershaper
# git clone https://github.com/magnific0/wondershaper.git
# cd wondershaper
# make install
# systemctl enable --now wondershaper.service
# wondershaper -s -a wlan0
Configure it in /etc/systemd/wondershaper.conf for the internal interface.
Originally I had wondershaper on my external interface (one of them), but I notice that SSH traffic was laggy when copying files in the internal network. Putting wondershaper on this interface helped; this makes sense if it’s doing class based queuing — which is what I really wanted. i.e., always do all SSH packets before doing any HTTP packets.
A media server (for the telly) using miniDLNA. First make the directory and install:
# cd /srv
# mkdir dlna
# chmod a+rwx dlna
# cd dlna
# mkdir music
# mkdir pictures
# mkdir videos
# chmod a+rwx *
# apt-get install minidlna
Next, configure in /etc/minidlna.conf.
network_interface=br0
media_dir=A,/srv/dlna/music
media_dir=P,/srv/dlna/pictures
media_dir=V,/srv/dlna/videos
db_dir=/var/cache/minidlna
log_dir=/var/log
inotify=no
max_connections=2
After /etc/init.d/minidlna restart the server now shows up in Windows Media Player on my win10 desktop.
There isn’t much point having inotify=yes because the contents change so ingrequently.
Therefore I’m going to have to remember to
# minidlnad -R
to force a re-indexing.
Windows file shafing – samba will be useful for copying files to the media server.
# apt-get install samba
# vi /etc/samba/smb.conf
Configure the shares...
interfaces = br0
bind interfaces only = yes

[Media Server]
	comment = DLNA media server
	read only = no
	path = /srv/dlna
	guest ok = yes
 	browseable = yes
	writable = yes
 	create mask = 0775
	directory mask = 0775
# smbpasswd -a rwb
# systemctl restart smbd
I wouldn’t want my SE/30 to feel left-out.
# apt-get install netatalk
# mkdir /srv/netatalk
# chmod a+rwx /srv/netatalk
# vi /etc/netatalk/afp.conf
Only need a simple single shared location.
;
; Netatalk 3.x configuration file
;

[Global]
; Global server settings
log file = /var/log/netatalk.log
uam list = uams_guest.so

; [Homes]
; basedir regex = /xxxx

; [My AFP Volume]
; path = /path/to/volume

; [My Time Machine Volume]
; path = /path/to/backup
; time machine = yes

[netatalk@imac51]
path = /srv/netatalk
guest account = rwb ; doesn't work
file perm = 0644
directory perm = 0775
Useful to add it as Samba too for when I've downloaded stuff on win10.
[Netatalk]
	comment = netatalk
	read only = no
	path = /srv/netatalk
	guest ok = yes
 	browseable = yes
	writable = yes
 	create mask = 0775
	directory mask = 0775
To do: share an lpd printer.
Don’t! It simply doesn't work. To get SSL to work you effectively have to do a man-in-the-middle attack on all traffic, and the cache hit ratio is miniscule anyway.
Anyway: on the off-chance that for some reason you need to do this then here is what I found...
The basic instructions are straightforward, but we need to add support for SSL. Let’s do the simple thing first.
# apt-get install squid
# vi /etc/squid/squid.conf
Add to the top:
http_access allow all
http_port 3128 intercept
visible_hostname squid.proxy
Then add these before the masquerade rules by flusing, adding these, then re-adding the masquerade
(I’ve started maintaing a script /root/iptables.sh that fluses, adds the rules in the right order,
and then saves):
# iptables -F

# iptables -t nat -A PREROUTING -i br0 -p tcp --dport 80 -j DNAT --to 192.168.1.51:3128
# iptables -t nat -A PREROUTING -i br0 -p tcp --dport 80 -j REDIRECT --to-port 3128

# # re-add masquerade and save
That should now be up and running. However, it won’t do much because everything is HTTPS these days.
This is simply not possible as a transparent proxy; instead explicitly add the proxy to the browser settings.
All of the guides on the Internet at the time of writing are obsolete because
ssl-bump
has been replaced with
server-first
and server-first
has been replaced with
peek-n-splice.
The next problem is that Squid in the Debian package is compiled without support for SSL. Therefore we have to compile our own.
Squid build guide from Malaya Digital:
# cd ~
# mkdir squid-build
# cd squid-build
# apt-get install openssh-server net-tools
# apt-get install openssl devscripts build-essential fakeroot libdbi-perl libssl-dev# libssl1.0-dev
# apt-get install dpkg-dev
# apt-get source squid
# apt-get build-dep squid
# cd squid-4.6/
# vi debian/rules
# dpkg-source --commit
In debian/rules file add to DEB_CONFIGURE_EXTRA_FLAGS the flags:
--with-default-user=proxy \
--enable-ssl \
--enable-ssl-crtd \
--with-openssl \
--disable-ipv6
Go!
# ./configure
# fakeroot dpkg-buildpackage # fails
# fakeroot debian/rules binary
# debuild -us -uc
So, now what?
# cd ..
# pwd
/root/squid-build
# mv squid3*.deb squid3.deb.NotIncluded
# dpkg -i *.deb
Make SSL certificate thingamajig — I’ve never understood them.
# apt-get install openssl
# mkdir -p /etc/squid/cert
# cd /etc/squid/cert
# openssl req -new -newkey rsa:4096 -sha256 -days 365 -nodes -x509 -keyout myCA.pem -out myCA.pem
# openssl x509 -in myCA.pem -outform DER -out myCA.der
# chown -R proxy:proxy /etc/squid/cert
# chmod 700 /etc/squid/cert

# /usr/lib/squid/security_file_certgen -c -s /var/spool/squid/ssl_db -M 4MB
# chown -R proxy:proxy /var/spool/squid/ssl_db/
Now add to /etc/squid/squid.conf:
## Security
# http://bylenga.ddns.net/index.php?page=68KBrowsingSquid.php
acl Safe_ports port 443
acl Safe_ports port 80

http_access deny !Safe_ports

# Only allow cachemgr access from localhost.
# Not that it works.
acl localnet src 192.168.1.0/255.255.255.0
http_access allow localhost
http_access allow localnet
http_access allow localhost manager
http_access allow localnet manager
http_access deny manager
#http://192.168.1.31/Squid/cgi-bin/cachemgr.cgi/

http_access deny all

## Traditional proxy (not working)
http_port 3130 ssl-bump cert=/etc/squid/cert/myCA.pem generate-host-certificates=on dynamic_cert_mem_cache_size=4MB

## Transparent proxy: HTTP and HTTPS
on_unsupported_protocol tunnel

http_port 3128 intercept
visible_hostname squid.proxy

https_port 3129 intercept ssl-bump cert=/etc/squid/cert/myCA.pem generate-host-certificates=on dynamic_cert_mem_cache_si
ze=4MB

sslcrtd_program /usr/lib/squid/security_file_certgen -s /var/spool/squid/ssl_db -M 4MB

# We think this doesn't work and that it has be done in the firwall
#acl no_ssl_interception dstdomain .betfair.com
#ssl_bump none localhost
#ssl_bump none no_ssl_interception

#ssl_bump peek all
#ssl_bump splice all

# https://elatov.github.io/2019/01/using-squid-to-proxy-ssl-sites/
acl step1 at_step SslBump1
ssl_bump peek step1
ssl_bump bump all
ssl_bump splice all


## Allow server side certificate errors such as untrusted certificates, otherwise the connection is closed for such erro
rs
sslproxy_cert_error allow all
## Accept certificates that fail verification (should only be needed if using 'sslproxy_cert_error allow all')
sslproxy_flags DONT_VERIFY_PEER
...and new firewall rules...
iptables -t nat -A PREROUTING -i br0 -p tcp --dport 443 -j DNAT --to 192.168.1.51:3129
iptables -t nat -A PREROUTING -i br0 -p tcp --dport 443 -j REDIRECT --to-port 3129
The .pem file can be imported to Firefox as an Authority to get that working agan, and this
converts it to a .crt that can be added in Windows as Trusted Root Certification Authorities:
# openssl x509 -outform der -in myCA.pem -out myCA.crt
However things like Outlook, Teams, and GoogleDrive were still not working. Looking at the network tab in the browser dev tools gives you an idea of which domains need letting through.
Here is a command to see the most commonly cached domains and some cache statistics.
cat /var/log/squid/access.log | grep -Po "https?://([\w\d\.]+)/" | awk -F / '{print $3}' | sort | uniq -c |sort -k1,1nr -k2,2 | head

squidclient -h localhost cache_object://localhost/counters | grep client_http
# squidclient -h localhost cache_object://localhost/ mgr:info
# squidclient -h localhost cache_object://localhost/ mgr:utilization
Unfortunately it shows blanks for the HTTPS requests. However, the number is increasing so I think it’s working.
Even after farting about with fake certificates some stuff still doesn’t work so I decided to just let the problematic domains bypass Squid. To start with I thought that this needed to be done in the firewall (another reference for this claim) because by the time the request has been re-directed to squid it’s too late, but apparently not so and domains can be excluded in squid configuration. So I gave this a go:
acl DiscoverSNIHost at_step SslBump1
acl NoSSLIntercept ssl::server_name_regex "/etc/squid/no-proxy.txt"
ssl_bump peek DiscoverSNIHost
ssl_bump splice NoSSLIntercept
ssl_bump bump all
and everything stopped working. Therefore on to the firewall approach.
The problem with using domain names with the -d flag in iptables
is that it is resolved to an IP address at the time the command runs.
It’s better to use an ipset that can be refreshed by a
cron job.
So: first here is a script for refreshing an ipset:
#!/bin/sh

ipset -L no-proxy >/dev/null 2>&1
if [ $? -ne 0 ]; then
        echo "Creating ipset: no-proxy."
        ipset create no-proxy hash:ip
fi

ipset flush no-proxy

if [ -f "/etc/squid/no-proxy-iptables.txt" ]; then
        for domain in $(cat /etc/squid/no-proxy-iptables.txt); do
                for address in $( dig a $domain +short | grep -P -e '^(\d{1,3}\.){3}\d{1,3}$' ); do
                        echo $domain " -> " $address
                        ipset add no-proxy $address
                done
        done
else
        echo "File doess not exist: /etc/squid/no-proxy-iptables.txt"
fi
And gere is my new firewall script:
#!/bin/sh

iptables -t nat -F
iptables -t mangle -F
iptables -F
iptables -X

# Squid: exceptions
ipset -L no-proxy >/dev/null 2>&1
if [ $? -eq 0 ] ; then
        iptables -t nat -A PREROUTING -i br0 -m set --match-set no-proxy dst -j ACCEPT
fi

# Squid: exclude DHCP devices that probably don't know about the fake certificate.
iptables -t nat -A PREROUTING -i br0 -m iprange --src-range 192.168.1.101-192.168.1.199 -j ACCEPT

# Squid: HTTP
iptables -t nat -A PREROUTING -i br0 -p tcp --dport 80 -j DNAT --to 192.168.1.31:3128
iptables -t nat -A PREROUTING -i br0 -p tcp --dport 80 -j REDIRECT --to-port 3128

# Squid: HTTPS
iptables -t nat -A PREROUTING -i br0 -p tcp --dport 443 -j DNAT --to 192.168.1.31:3129
iptables -t nat -A PREROUTING -i br0 -p tcp --dport 443 -j REDIRECT --to-port 3129

# IP masquerade

iptables -A FORWARD -o wlan0 -i br0 -s 192.168.1.0/24 -m conntrack --ctstate NEW -j ACCEPT
iptables -A FORWARD -m conntrack --ctstate ESTABLISHED,RELATED -j ACCEPT
iptables -t nat -F POSTROUTING
iptables -t nat -A POSTROUTING -o wlan0 -j MASQUERADE
iptables -t nat -A POSTROUTING -o enp0s6f1u2 -j MASQUERADE

# echo 1 > /proc/sys/net/ipv4/ip_forward

iptables-save > /etc/iptables/rules.v4
Bought a cheapo USB wifi device. It shows up in lsusb
as Bus 002 Device 003: ID 0bda:c811 Realtek Semiconductor Corp.
which isn’t very helpful.
Plugging it into win10 revealed that it is a Realtek 8811cu, so let’s give that a go...
Also possibly of help (output from a different machine with a different crappy USB WiFi adapter):
# usb-devices
...
T:  Bus=01 Lev=03 Prnt=03 Port=00 Cnt=01 Dev#=  4 Spd=480 MxCh= 0
D:  Ver= 2.00 Cls=00(>ifc ) Sub=00 Prot=00 MxPS=64 #Cfgs=  1
P:  Vendor=0bda ProdID=8179 Rev=00.00
S:  Manufacturer=Realtek
S:  Product=802.11n NIC
S:  SerialNumber=00E02D2B29D3
C:  #Ifs= 1 Cfg#= 1 Atr=a0 MxPwr=500mA
I:  If#=0x0 Alt= 0 #EPs= 3 Cls=ff(vend.) Sub=ff Prot=ff Driver=r8188eu

# ethtool -i wlan0
driver: r8188eu
version: 5.10.63+
firmware-version:
expansion-rom-version:
bus-info: 1-1.4.1:1.0
supports-statistics: no
supports-test: no
supports-eeprom-access: no
supports-register-dump: no
supports-priv-flags: no

#  modinfo r8188eu
...
It appears that the Realtek 8811cu does not support multiple SSIDs.
# apt-get install dkms
# git clone https://github.com/fastoe/RTL8811CU.git
# cd RTL8811CU
# git clone https://github.com/brektrou/rtl8821CU.git
# cd rtl8821CU
# make
# make install
# shutdown -r now
And it appeared as wlx00e032800384.
It needs adding to /etc/network/interfaces but not as auto because it might not be plugged in.
### WiFi for access points
#https://medium.com/@renaudcerrato/how-to-setup-a-virtual-ssid-with-hostapd-804c13c9a3c2
#https://github.com/sensepost/hostapd-mana/wiki/Multiple-Networks

# USB WiFi with aerial: house WiFi
allow-hotplug wlx00e032800384
iface wlx00e032800384 inet manual # Use manual because it's in the bridge and doesn't have an address itself.
#       pre-up ip link set dev wlx00e032800384 address 02:e0:32:80:03:80
        up /usr/sbin/wondershaper -a wlx00e032800384 -d 3000 -u 3000
        down /usr/sbin/wondershaper -a wlx00e032800384 -C

# USB WiFi without aerial: WEP
allow-hotplug wlx08beac0a6c1d
# auto means at boot/service-(re)start which is error if not plugged in. Hotplug includes boot/(re)start.
iface wlx08beac0a6c1d inet static
        address 192.168.3.31
        netmask 255.255.255.0
It turns out that hostapd is the tool for the job for access points.
# apt-get install hostapd
# vi /etc/default/hostapd
In which set: DAEMON_CONF="/etc/hostapd/hostapd.conf"
and then create and chomd a+r that file and add:
interface=wlx00e032800384
bridge=br0
#driver=rtl8821cu
country_code=UK
ssid=imac51
hw_mode=g
channel=acs_survey
wpa=2
wpa_passphrase=password
wpa_key_mgmt=WPA-PSK
wpa_pairwise=TKIP
rsn_pairwise=CCMP
auth_algs=1
macaddr_acl=0
The configuration can be checked by running
# hostapd /etc/hostapd/hostapd.conf
Note: add the interface to br0 And then...
# /etc/init.d/networking restart
# /etc/init.d/hostapd restart
Windows can connect and load web pages, but Windows Wifi tray thing seems slow to recognise that there is Internet access.
It didn’t survive a restart. Apparently it’s necessary to
# systemctl unmask hostapd
# systemctl enable hostapd
# systemctl start hostapd
# systemctl status hostapd
whatever that is.
Use a script in /etc/network/if-down.d to turn off wifi when the main uplink isn’t available.
#!/bin/sh

# If wlan0 goes down then shut down the AP.

if [ -z $IFACE ] || [ $IFACE != "wlan0" ]; then exit; fi

systemctl stop hostapd@wlx00e032800384
And a script /etc/network/if-up.d to turn it on again
#!/bin/sh

# If wlan0 comes up and is connected to RWB then start the AP

if [ -z "$IFACE" ] || [ "$IFACE" != "wlan0" ]; then exit; fi

ssid=`iw dev wlan0 info | grep ssid | cut -d ' ' -f 2`

if [ -n "$ssid" ] && [ $ssid = "RWB" ]; then
        systemctl start hostapd@wlx00e032800384
fi
Absolutely cannot make this work.
The iMac with AirPort card running OS X 10.3 doesn&rsquot; support WPA, so I want to run a second access point that is open
but limited by hardware address. Such an AP is supported by hostapd
ssid=mini31_open
wpa=0 # open
macaddr_acl=1 # 1 = deny unless in accept list
accept_mac_file=/etc/hostapd/hostapd.accept
But it is unknown how to get both access points working at the same time.
The Internet is connected via wlan0 but in fact this is via my phone. I
do not have home broadband because I acquired a 100GB/month SIM.
The first problem is that this wifi
is not re-connecting when I come back into the house after being out.
The solution seems to be to switch the configuration to roaming
by moving the connection credentials into /etc/wpa_supplicant/wpa_supplicant.conf and
then adding them to /etc/network/interfaces like this:
### WiFi to Internet: physical plus virtual for each network defined in wpa_supplicant.conf

auto wlan0
allow-hotplug wlan0
iface wlan0 inet manual
        wpa-roam /etc/wpa_supplicant/wpa_supplicant.conf
#        wpa-ssid RWB
#        wpa-psk pasword

allow-hotplug RWB
iface RWB inet dhcp
        metric 1


### 4G to Internet

auto enp0s6f1u2
allow-hotplug enp0s6f1u2
iface enp0s6f1u2 inet dhcp
        metric 9999
Set the metric so that wlan0 is used in preference.
It turns out that iptables just automatically knows to ignore rules about interfaces that are down
(and stop ignoring them when the interface returns). Therefore it suffices to add a single new rule:
# IP masquerade

iptables -A FORWARD -o wlan0 -i br0 -s 192.168.1.0/24 -m conntrack --ctstate NEW -j ACCEPT
iptables -A FORWARD -m conntrack --ctstate ESTABLISHED,RELATED -j ACCEPT
iptables -t nat -F POSTROUTING
iptables -t nat -A POSTROUTING -o wlan0 -j MASQUERADE
iptables -t nat -A POSTROUTING -o enp0s6f1u2 -j MASQUERADE
It occurred to me that most of this would probably run fine on a Raspberry Pi — with much lower power consumption — were it not for my use of SQL Server.
I have a C# program that scrapes data and stores it to an SQL Server database. This currently running on a Dell D610, but it’s too slow to be able to query the data. Therefore I want to move it to this machine — which will also save some power!
Microsoft has some instructions for installing C# on Debian.
# wget https://packages.microsoft.com/config/debian/10/packages-microsoft-prod.deb -O packages-microsoft-prod.deb
# dpkg -i packages-microsoft-prod.deb
# apt-get update
# apt-get install -y apt-transport-https
# apt-get update
# apt-get install -y dotnet-sdk-3.1
...and for SQL Server...
We did apt-transport-https already. Need to add source deb http://ftp.debian.org/debian jessie main to the
end of /etc/apt/sources.list
# apt-get install gnupg
# exit
$ curl https://packages.microsoft.com/keys/microsoft.asc | sudo apt-key add -
$ curl https://packages.microsoft.com/config/ubuntu/16.04/mssql-server-2017.list | sudo tee /etc/apt/sources.list.d/mssql-server.list
$ sudo apt-get install mssql-server
$ sudo /opt/mssql/bin/mssql-conf setup
...
...
After changing mail config use:
# update-exim4.conf
# systemctl restart exim4
To redirect mail to root to theuser use /etc/aliases.
To redirect mail to theuser to an external (SMPT) account: /etc/exim4/update-exim4.conf.con
dc_eximconfig_configtype='satellite' # was local. Satellite means no local mail which is what I want -- everthing goes to my real address.
dc_other_hostnames='mini31' # Fuck knows what this is.
dc_local_interfaces='127.0.0.1 ; ::1'
dc_readhost='rwb.me.uk' # Fuck knows what this is.
dc_relay_domains=''
dc_minimaldns='false'
dc_relay_nets=''
dc_smarthost='send.one.com::587' # 25, 465, 587
CFILEMODE='644'
dc_use_split_config='false'
dc_hide_mailname='true'
dc_mailname_in_oh='true'
dc_localdelivery='mail_spool'
And /etc/exim4/passwd.client:
send.one.com:my-real-address@rwb.me.uk:TopSecretPassword
The SMTP server requires that the from address matches the username. To rewrite all messages with the same from address add to
the REWRITE CONFIGURATION seciton of
/etc/exim4/exim4.conf.template:
* my-real-address@rwb.me.uk Ffr
Use mailq to look for anything that’s got stuck.